How to add data
The ➕ Add data section in the sidebar is where you record everything that happens on a field — sowing, fertilising, spraying, harvest, tillage and soil samples. Each operation uses one simple form: you can either import a file that your machine or app exported, or type the values in manually.
Prerequisites
- A farm created and connected.
- At least one field added (see Add a field).
- For crop operations, at least one crop added (under Farm & Fields → Your crops).
1. Pick the operation
Click ➕ Add data in the sidebar. You’ll see the operations grouped into:
- Crop operations — Planting, Fertilizing, Spraying, Harvest
- Field work — Plowing, Harrowing
- Environment — Soil sample, Irrigation, Other
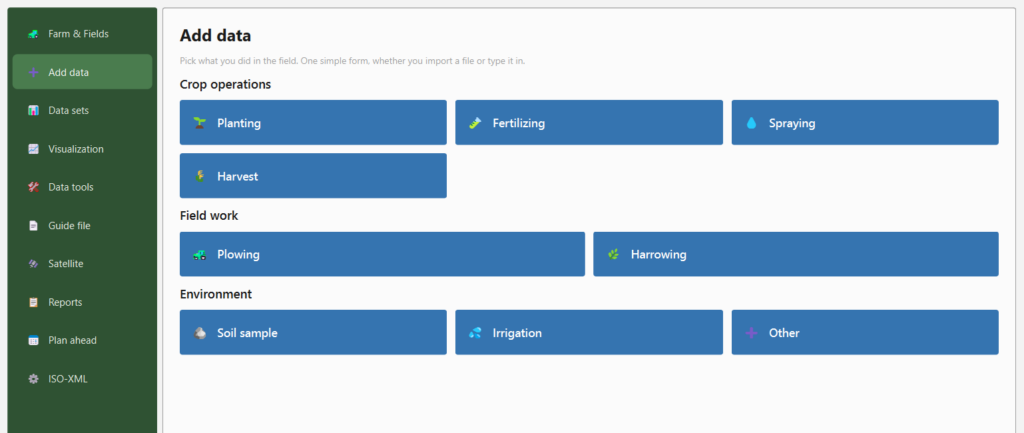
Click the card for what you did in the field.
2. Choose how to add the data
Every operation form starts with “How do you want to add this data?” and a toggle:
| Choice | Use when |
|---|---|
| Import a file | You have an export from a terminal, app or another program. |
| Enter manually | You want to type a few values by hand. |
Use ← Choose another operation at the top to go back to the picker.
Import a file
Pick the format your machine or app exported — the columns are read automatically:
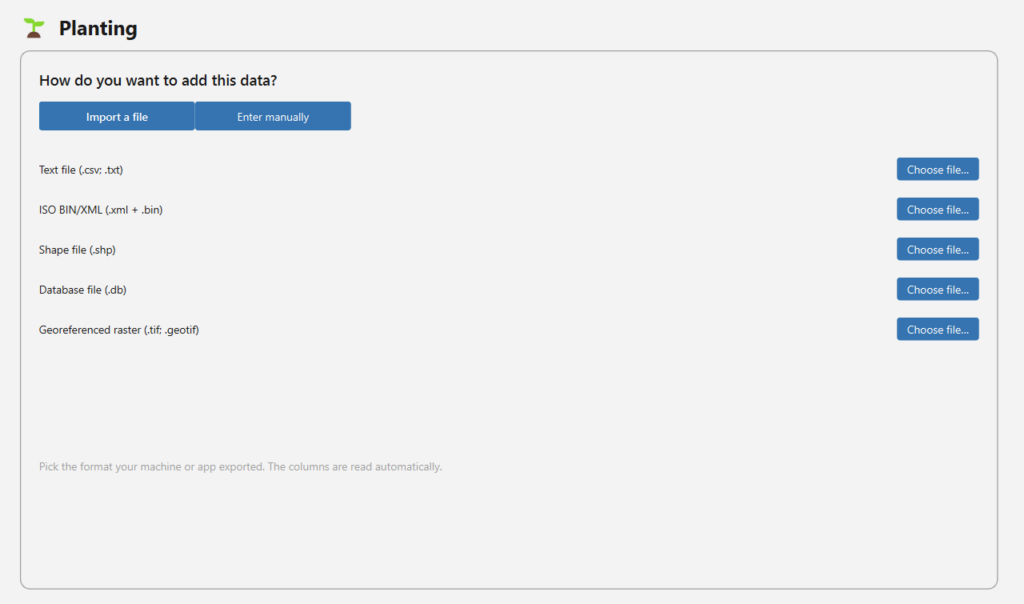
| Format | Extension |
|---|---|
| Text file | .csv, .txt |
| ISO BIN/XML | .xml + .bin |
| Shape file | .shp |
| Database file | .db |
| Georeferenced raster | .tif, .geotif |
Click Choose file… next to the matching format. For text files you’ll then map the columns (separator, coordinate system / EPSG, which columns hold latitude/longitude, date format, and which columns to import) before saving. (Not every format is available for every operation — e.g. Harvest has no raster option.)
Enter manually
Select the Field, the Crop (for crop operations), and the date under When, then fill in the operation’s values and press Save:
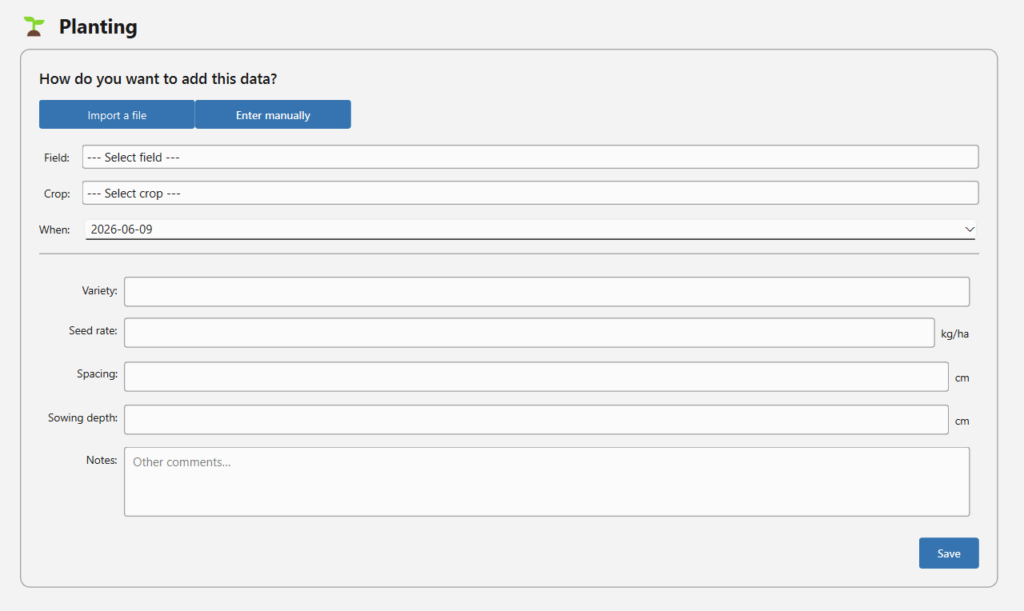
The fields shown depend on the operation:
| Operation | Crop? | Manual fields |
|---|---|---|
| Planting | yes | Variety, Seed rate (kg/ha), Spacing (cm), Sowing depth (cm) |
| Fertilizing | yes | Variety, Rate (kg/ha), Sowing depth (cm) |
| Spraying | yes | Variety, Rate (kg/ha), Wind speed (m/s), Wind direction (deg) |
| Harvest | yes | Yield (kg/ha), Total yield (tonnes) |
| Plowing | no | Depth (cm) |
| Harrowing | no | Depth (cm) |
| Soil sample | no | Clay (%), Humus (%), pH (0–14), Average Rx |
| Other | yes | Free name + up to several Option / Unit / Value triples |
A Notes field is available for extra comments.
Special operations
- Harvest — besides plain import, GeoDataFarm can interpolate the yield between harvest points to build a continuous yield surface over the field. Point data is automatically converted to polygons.
- Irrigation — clicking the Irrigation card opens the Raindancer window, where you can load irrigation data from your Raindancer account and create an irrigation year. (Manual irrigation entry is planned for the future.)
- Other — a flexible operation for anything not covered above. Give it a name and add as many Option / Unit / Value rows as you need; GeoDataFarm stores it in a custom table.
After saving
Saved data appears under 📊 Data sets, where you can review, rename, combine, split and edit it, and add it to the QGIS canvas. Use 📈 Visualization to style it and 📋 Reports to summarise it.